
Yes – engineered hardwood floors can be refinished, but only if the top wood layer is thick enough. Engineered hardwood is built with a real hardwood veneer glued atop plywood layers. In practice, that means the only part you can sand off is the thin surface wear layer. As long as that veneer is around 2mm or more, you can usually sand away the old finish and recoat the floor. For example, floors with a very thick 6mm veneer can be refinished up to ~10 times (similar to solid wood), whereas one with only 1–2mm of hardwood might only handle one light sanding (or just a fresh coat of finish) in its lifetime.
What Is Engineered Hardwood?
For context, engineered hardwood flooring is made of multiple glued layers: a thin real wood surface (the wear layer) on top of plywood or fiberboard. This layered construction makes the floor more stable with moisture changes, but it also limits refinishing. Only the top veneer – typically 2–6mm thick – is actual solid wood that can be sanded. If that wear layer is thick, you can sand and refinish it; if it’s very thin, sanding will quickly reach the plywood core. Think of engineered boards like a cake: you can trim off some icing (the hardwood) and give it new frosting, but you cannot carve into the cake layers (plywood) beneath.
How to Refinish Engineered Hardwood
Refinishing engineered wood floors follows a step-by-step process. First you clean and sand the surface to remove the old finish. Then you apply stain if you want to change the color, and finally seal the wood with new coats of finish. Below are the typical refinishing steps:
- Clean thoroughly: Remove all furniture and sweep/vacuum the floor. Wipe it with a slightly damp, pH-neutral wood-floor cleaner to remove any dirt. A super-clean surface ensures better sanding results.
- Sand with fine grit: Use a lightweight orbital sander (or a floor drum for very experienced users) with ~100–120 grit sandpaper, and move with the wood grain. The goal is to strip off the old finish and surface scratches without digging into the wood. Start gently; you may not need to remove more than the finish.
- Vacuum dust: After each sanding pass, vacuum up all the dust – even use a slightly damp cloth on the floor between sandings. Keeping the surface dust-free is crucial so no grit gets trapped under the new finish.
- Stain (optional): If you want a new color, test a wood stain on a hidden area first. Then apply it evenly with a brush or rag, wiping off any excess. Follow the stain manufacturer’s instructions on drying time.
- Seal with finish: Roll or brush on thin, even coats of high-quality polyurethane (water- or oil-based). Generally apply 2–3 coats, lightly sanding with very fine (220+) sandpaper or a buffing pad between coats for a smooth result. Work quickly with each coat and avoid drips.
- Allow full curing: Let the finish harden completely. Most floor finishes need at least 24–72 hours before heavy foot traffic or furniture is returned. Check the product label – you want that finish rock-solid before you walk on it.
- Maintain and protect: Once cured, keep your refinished floor clean to prolong its life. Sweep/vacuum regularly and wipe spills immediately. Use area rugs in high-traffic zones and felt pads under furniture legs to prevent new scratches. This maintenance helps delay the next refinish job.
Following these steps carefully can give your engineered floor a like-new glow. A professional might also use a dust-controlled sander (as shown above) to keep cleanup down, but you can rent or buy the needed tools if you plan to DIY.
Key Factors Before Refinishing
Before jumping in, consider these critical factors:
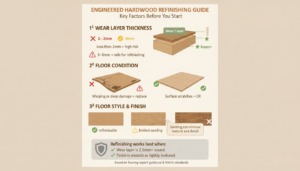
- Wear Layer Thickness: This is the most important. If the hardwood veneer is less than about 2mm, sanding risks burning through to the plywood. Experts typically say ~2mm is the minimum for any sanding. Thicker veneers (3–6mm) let you sand more aggressively or more times. In general, a 3mm layer can handle a couple of refinishes, while 6mm (or more) can be refinished almost like solid wood. Conversely, very thin layers (1–2mm) are fragile – many sources note these usually only allow one light sanding or just a recoating. When in doubt, measure a plank edge: if you see the real wood is under 2mm thick, think twice.
- Floor Condition: Only refinish if the boards are sound. If planks are badly warped, cupped, cracked, or have deep gouges/stains through the veneer, replacement might be better. One flooring guide explicitly warns that severely damaged floors might need replacing rather than refinishing. In short, surface scratches and dull finish are ideal for refinishing – if the damage goes into the wood or core, a new floor could be safer.
- Floor Style and Finish: Certain textures (like hand-scraped or distressed wood) can complicate sanding. Refinishing tends to flatten out any carved or beaded details. In fact, one expert notes that for hand-scraped engineered floors, you can usually only do a very light single refinish because sanding will erase the unique character. If your floor has a special surface (beveled edges, heavy distressing, etc.), plan to sand gently or not at all, or just refresh the finish.
If any of the above factors are a problem (too thin, too damaged, or too intricate), refinishing may not be worth it. But if the wear layer is decent and the floor is generally intact, you can proceed knowing you have wood to work with. (The National Wood Flooring Assoc. even recommends at least a 2.5mm veneer for safe sanding on textured boards.)
How Many Times Can You Refinish?
Realistically, engineered floors support far fewer refinishes than solid wood. Here’s a rough guideline by wear-layer thickness:
- Thin (1–2 mm veneer): Only 1–2 times. One source says a 1–2mm layer can be refinished at most a couple of times – often just one. Anything less than 2mm is almost never safe to sand more than once.
- Medium (3 mm veneer): About 2–3 times. Many guides agree 3mm can handle a couple of sanding cycles.
- Thick (4–6 mm+ veneer): Several times (3–4 or more). For example, one reference notes a 4mm layer can take 3–4 refinishes, and a 6mm layer can be refinished as many times as solid wood (roughly 10 times).
Bottom line: assume only a few refinishes. As Clark’s Flooring puts it, “engineered hardwood floors can be refinished 1–3 times, depending on the thickness of the wear layer”. If you need a refresher in a decade or two, great – but after that, the veneer will likely be too thin for more sanding.
Refinish vs Replace
It’s often more cost-effective and eco-friendly to refinish rather than replace a worn-out engineered floor. Refinishing means you keep most of the same boards and just restore their surface – this saves material and labor. Clark’s Flooring notes that sanding and recoating “is usually more cost-effective and less disruptive” than ripping everything up and installing new planks.
However, don’t force a refinish if it won’t fix the problem. For deep structural issues or paper-thin veneers, a replacement may be the only solution. One industry expert bluntly says: if the engineered floor’s veneer “is not thick enough to withstand sanding, you may need to consider replacing the floors”. In practice, use refinishing for normal wear and light damage, but plan to replace if boards are heavily damaged or the wear layer is almost gone.
Professional Advice vs. DIY
Refinishing is a skilled job. It’s tempting to rent a sander and do-it-yourself, but mistakes can be expensive. As one authority warns, “improper sanding can damage your engineered hardwood floors, potentially requiring costly repairs or replacement”. Engineered wood leaves very little room for error – sanding too long or with the wrong grit can burn through the thin veneer.
If you’re unsure, consult a flooring professional. They have dust-free (or low-dust) sanding equipment and years of experience with wood thicknesses and finishes. In fact, some flooring companies advise homeowners to get an expert opinion before starting a refinish on engineered boards. A pro can measure your veneer, recommend the right approach, and ensure uniform results. In short, if you lack floor-sanding experience, hiring a pro can actually save money (by avoiding mistakes) and deliver a better final look.
Brand Example: Hallmark Floors
Some engineered wood products are designed specifically with refinishing in mind. For example, Hallmark Floors makes engineered planks with an “ultra thick wear layer” – essentially as thick as ¾″ solid wood – allowing up to 3 guaranteed sandings. This shows how much difference a thick top layer makes. Other reputable brands (e.g. Shaw, Mohawk) offer premium engineered lines with 4–6mm veneers for precisely this reason. When shopping for flooring, look at the wear-layer spec or ask the dealer how many times you can sand it. In general, higher-quality engineered hardwood will call out a thicker wear layer and may even mention “refinishable” on the packaging or warranty.
Conclusion
In summary, yes – you can refinish engineered hardwood floors, if the top hardwood layer is thick enough. With a sufficient wear layer (usually ~2–4mm or more) and floors in decent shape, sanding and re-coating can restore the wood’s beauty for a fraction of replacement cost. Follow the steps above carefully (or hire a pro), and be mindful that you’ll get only a few refinishes out of the floor. If your floor’s veneer is very thin or the damage runs deep, refinishing may not work and you may need to replace the boards.
Knowing these details helps you make the right choice. A well-executed refinish can make your engineered floor shine like new, extending its life and saving you money