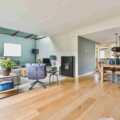
Combining tile and wood floors can create a beautiful, cohesive look when done right. Yes, you can mix tile and wood seamlessly by planning your transition carefully. For example, designers often use a thin border or transition strip between ceramic or porcelain tile and oak or walnut hardwood to tie the rooms together. The key is to ensure a smooth edge and complementary colors so that one floor flows into the next. In practice, homeowners install wood in living spaces and durable tile in wet areas, then blend them at doorways or open-plan thresholds. With the right transition detail – such as a flush reducer, T-molding, or decorative tile inlay – wood and tile floors can meet without looking awkward.
Combining these materials is especially popular in modern, open-concept homes. In fact, flooring experts say the tile-to-wood transition “is a relatively simple problem to solve” with a bit of creativity. When done well, the result is a custom, high-end aesthetic that guests will notice. For example, pairing dark hardwood planks with light ceramic tile creates an “eye-opening” contrast that flows naturally between rooms.
Why Mix Tile and Wood Flooring?
Mixing tile and wood isn’t just a design trend – it has real benefits:
- Zoned function: Use porcelain or ceramic tile in kitchens, bathrooms, mudrooms or laundry rooms for its water resistance, and hardwood (oak, maple, etc.) in living areas for warmth. This practical zoning also looks purposeful when planned together.
- Durability + comfort: Tile floors stand up to moisture, spills, and heavy foot traffic, while wood floors add natural warmth and comfort in dry areas. Together they give you the best of both worlds.
- Visual interest: Alternating materials can define spaces. A classic example is a kitchen with patterned tile that “frames” into a cozy living room with wood floors. A narrow border or trim between them can actually enhance the design.
- Aesthetic contrast: A rich warm wood tone against a cool neutral tile creates depth. For instance, Enviroquest notes that switching from dark wood to light tile is very eye-opening – guests will love the visual flow of contrasting tones.
Key takeaway: Combining wood and tile adds style and function. When planned carefully – matching or contrasting colors deliberately – the mix can look intentional and spacious. For inspiration, browse our tile collections and hardwood collections to find colors and finishes that complement each other.
What Should I Consider Before Blending Tile and Wood?
Before installing mixed floors, do some planning:
- Color & style: Choose tile and wood that harmonize or purposefully contrast. For example, a white or gray tile pairs beautifully with a light oak floor, while a warm beige porcelain works with cherry or walnut wood. Keep the overall palette cohesive – neutral grout or consistent accent colors help unify both floors.
- Floor heights: Check the thickness of each floor. Tile with cement backer and thin-set can be about ¼–½ inch thicker than wood. Ideally, install the hardwood first (its thickness is fixed) and then build up the tile floor so they meet flush. If the wood ends up higher, you may need a reducer strip or cut the wood planks. If the tile is higher, you can add plywood under the wood or a custom underlayment to level the transition. Always aim for a smooth, even seam.
- Subfloor prep: Both floors need a flat, sturdy base. Tile requires a cement backer board or leveling compound, while wood needs a plywood underlayment or tongue-and-groove subfloor. Make sure the joints between materials are well-supported to prevent movement or cracking.
- Grain direction & layout: Consider the layout of each material. If hardwood planks run perpendicular to the tile, plan how their cut edges will meet. One option is to add a thin border of matching wood or tile to cap the exposed ends. This not only hides any cut edges but gives a framed look. For tiles, plan whether grout lines align or intentionally break at the seam.
- Expansion gap: Wood expands and contracts with humidity; tile does not. Leave a proper expansion gap (often about ½ inch) at the perimeter of the wood even where it meets tile. This gap should be covered with a flexible filler so the wood can move. (Experts recommend inserting foam backer-rod in the gap and finishing with a sanded color-matched caulk to blend in.)
- Installation order: Whenever possible, install the hardwood first. As one contractor advises, wood “has a very definite thickness,” whereas the tile floor can be built up with underlayment and thin-set to meet that height. After the wood is down, tile installers can fine-tune the transition.
- Professional help: Combining floors can be trickier than it looks. If your transition is complex (angled corners, high-traffic areas, etc.), consider getting expert advice or hiring a pro. A home inspector or flooring specialist can suggest the best flow and installation order to avoid problems.
In short, prepare thoroughly: match colors, account for thickness, and leave movement gaps.
Key takeaway: A little extra planning on color, layout, and floor height pays off in a flawless transition. Check out our transition moldings and trim collections for products (T-moldings, reducers, Schluter profiles, etc.) that can simplify this process.
What Transition Styles Can I Use Between Tile and Wood?
There are many creative ways to join the two floors. Some popular transition techniques include:
- Classic Border (Trimmed Frame): One of the simplest solutions is a narrow border strip of flooring between the tile and wood. A thin tile border frames the oak floor, creating a clean, “framed” look. Done right, this classic straight-line border looks timeless. (Clé Tile calls it a “framed” transition – either in wood or a contrasting tile – that “frames the wood and tile beautifully”.)
- Straight Edge (Minimal Flush): A simple straight cut from tile to wood is often used in modern designs. This means the two materials meet in a flush, flat seam. It creates a seamless flow but requires precision cutting. Usually a slim metal or wood reducer (seen here) caps the difference. Clé Tile notes this straight line transition is common in contemporary spaces, though it demands an expert touch to align the floors perfectly. For example, leaving a ½–⅝″ gap and embedding an aluminum threshold strip can achieve a very low-profile join. This flush style is sleek and unadorned, ideal for a minimalist or industrial look.
- Patterned Transitions: You don’t have to stick to squares! Using geometric shapes can create a dynamic meeting line. For instance, cutting tile into a herringbone or chevron pattern where it meets straight wood planks adds movement. Clé Tile praises zigzag patterns, noting that herringbone/chevron “angular lines create visual movement, blending the two different materials.” Another striking example is to use hexagon tiles at the transition: letting the wood “flow around” the irregular edges of the hexes. In the photo below (hex tile into wood), the irregular edge of the green hex tiles provides an asymmetric, eye-catching border that blends modern shapes with natural wood grain. This approach is great for adding a bold, artistic touch. Key takeaway: Patterned transitions (zigzags, hexes, angled cuts) turn a plain seam into a design feature. Limit the pattern to one material to avoid chaos – for example, keep only the tile section in hex or herringbone, while the wood side remains straight.
- Mosaic & Inlay Borders: For a decorative effect, insert a mosaic tile or inlay strip at the junction. This old-school trick uses small accent tiles (glass, ceramic, stone, or pebbles) to form a band between the floors. The narrow mosaic band above both caps the tile edge and adds sparkle, blending the colors. Enviroquest mentions that glossy mosaic tiles as a border is a “great way to mix tiles and wood.” Similarly, you could lay a single row of penny round or other patterned tile instead of plain grout at the seam. These decorative transitions not only hide the edge but become a focal point.
- Metal or Wood Thresholds: If you prefer a simpler finish, use a reducer strip or threshold molding. A metal transition profile (often aluminum or stainless steel) is common, especially where durability is needed (mudrooms, entryways). It provides a clean separation line while protecting the edges. The Enviroquest guide notes that straight-line metal transitions “will separate spaces between the ceramic tile and wood floor.” In the photo, a low-profile white metal strip covers the step between the wood-look plank and tile. (DIYers often install these by gluing the strip into a small gap.) Alternatively, a wooden T-molding can match the wood floor when thicknesses are similar. Transition strips are also available in matching wood grain finishes or anodized metal to suit any color scheme.
In summary, you have many options – from a classic flush border to an imaginative patterned edge. The best choice depends on your style: traditional (straight border), modern (clean line or metal strip), or creative (zigzag, mosaic). Always focus on a smooth junction and a pleasing material change.
Key takeaway: Plan your transition as a design feature. Use either a subtle flush trim or an eye-catching pattern, and make sure to bond it securely (for example, using construction adhesive on metal strips). Each approach (classic border, geometric cut, mosaic inlay, or trim molding) can yield a high-end look when executed carefully.
FAQ
Can I install tile and hardwood in the same room?
Yes. You can use tile in wet areas (like kitchens or baths) and hardwood in living spaces, then blend them at an open-plan joint. The transition should be planned carefully: use a flush reducer, wood border, or decorative tile inlay between the materials. This creates a cohesive flow between the tile and wood floors.
How do I handle a difference in thickness between tile and wood?
Match the floor heights by adjusting the subfloor. It’s usually easiest to install the wood first, since hardwood has a fixed thickness. Then add underlayment or cement backer board under the tile so its finish surface is flush. For instance, using ¼″ or ½″ cement board and mortar can raise the tile to meet the hardwood. If one floor ends up higher, you can use a slope reducer molding to bridge the step.
Should I leave a gap between wood and tile?
Yes. Leave a small expansion gap at the wood edge (often about half a tile width) before installing the tile. Then fill that gap with backer rod and flexible caulk that matches the floor color. Sanded caulk is commonly used here because it can flex with the wood and blends into grout lines. This gap allows the wood to expand without pushing into the tile, and caulking it neatly hides the space.
What kind of transition molding should I use?
It depends on your floors. If the wood floors are floating, use a T-molding profile that clips in. If solid-laid, a flush reducer strip is common. A popular choice is an aluminum or brass transition strip. As one DIY expert suggests, leave about ½″–⅝″ gap and then glue in an anodized aluminum strip. These strips come in various finishes to match wood or metal themes. Wood reducers and Schluter (metal) profiles are also options. In any case, make sure the strip sits flat and is well-adhered for durability.
Should I install wood or tile first?
Generally, install the hardwood first, then tile. Hardwood planks have a consistent thickness; tile workup (with underlayment and grout) can be adjusted to meet it. By laying wood first, you simplify height alignment. If you must install tile first (for example, remodeling only), be prepared to trim or shim the wood floor to fit. But whenever possible, wood-first makes it easier to achieve a flush transition.
For more authentic & Informative Ideas for Flooring and Home Improvement Visit DIY Flooring Ideas. Our industry expert authors share this information for the benefits of knowledge of our clients and audience.